[TUTORIAL] ZigZag Snippet

  1. 1. Click on the section you would like to add this component to. In this example, we will be inserting it into Main Content.

    Click on the section you would like to add this component to. In this example, we will be inserting it into Main Content.
  2. 2. Click on the Insert Snippet icon.

    Click on the Insert Snippet icon.
  3. 3. Click on or filter by name for "R25 - ZigZag - Content and Image."

    Click on or filter by name for "R25 - ZigZag - Content and Image."
  4. 4. You'll see a preview of the different variants appear on the right-hand side.

    You'll see a preview of the different variants appear on the right-hand side.
  5. 5. Click on INSERT

    Click on INSERT
  6. 6. First, we'll choose the color and style variant we want to use.

    First, we'll choose the color and style variant we want to use.
  7. 7. In Visual Mode...

    In Visual Mode...
  8. 8. ...you'll have your choice of White or Color as the background of your text boxes in the ZigZag.

    ...you'll have your choice of White or Color as the background of your text boxes in the ZigZag.
  9. 9. If you choose Color in Visual Mode, the Color Theme row...

    If you choose Color in Visual Mode, the Color Theme row...
  10. 10. ...will allow you to choose which color variant you want to use.

    ...will allow you to choose which color variant you want to use.
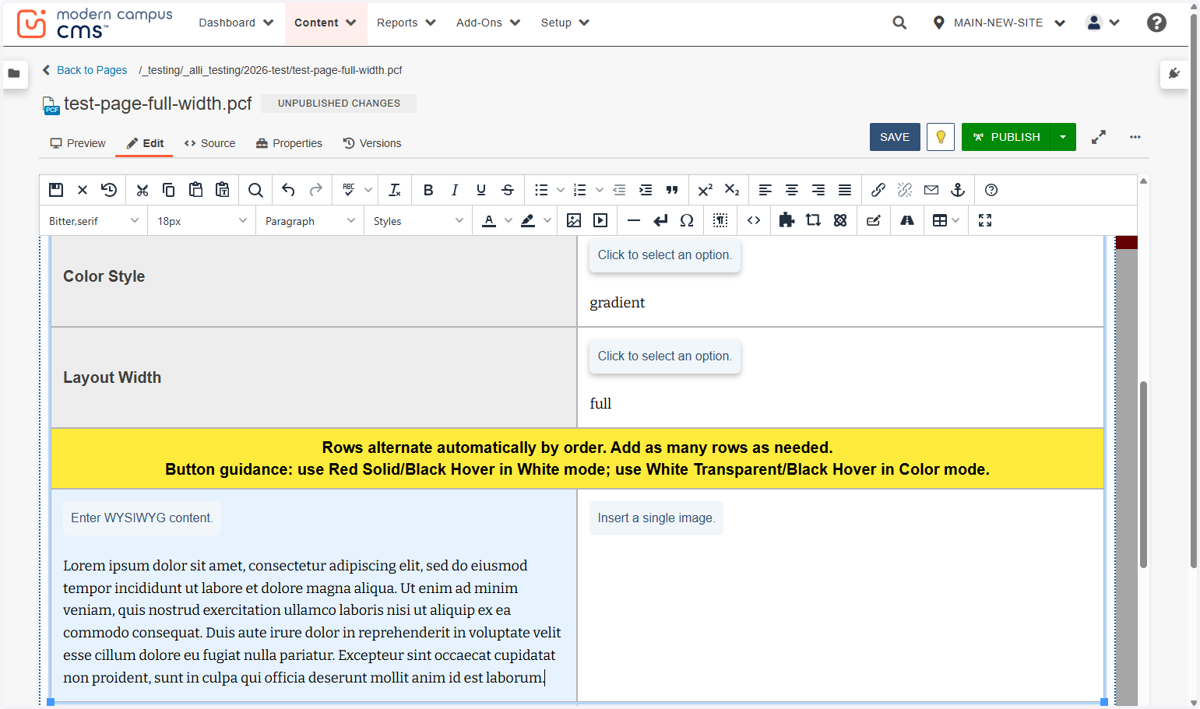
  11. 11. The Color Style row...

    The Color Style row...
  12. 12. ...gives you the option to choose a solid or gradient of that color to go over the text and image areas.

    ...gives you the option to choose a solid or gradient of that color to go over the text and image areas.
  13. 13. The Layout Width row...

    The Layout Width row...
  14. 14. ...will allow you between full-width or boxed (contained) ZigZags.

    ...will allow you between full-width or boxed (contained) ZigZags.
  15. 15. Check the yellow band for guidance on which buttons to use depending on your choice of color variant for your ZigZag.

    Check the yellow band for guidance on which buttons to use depending on your choice of color variant for your ZigZag.
  16. 16. Now you'll populate your text of your first box in "Enter WYSIWYG content."

    Now you'll populate your text of your first box in "Enter WYSIWYG content."
  17. 17. Paste selected text into element

    Paste selected text into element
  18. 18. To insert an image, place your cursor in the "Insert a single image" cell...

    To insert an image, place your cursor in the "Insert a single image" cell...
  19. 19. ...and click on the Insert/Edit Image in the WYSIWYG.

    ...and click on the Insert/Edit Image in the WYSIWYG.
  20. 20. Use the file chooser...

    Use the file chooser...
  21. 21. ...to select your image.

    ...to select your image.
  22. 22. Click on INSERT.

    Click on INSERT.
  23. 23. Be sure to enter appropriate alt text.

    Be sure to enter appropriate alt text.
  24. 24. Click on SAVE.

    Click on SAVE.
  25. 25. You can add as many rows as you would like using the Insert Row After icon. They will automatically alternate between images left/text right and text left/images right live page.

    You can add as many rows as you would like using the Insert Row After icon. They will automatically alternate between images left/text right and text left/images right live page.
  26. 26. You can right click on your text in the WYSIWYG column to insert text links...

    You can right click on your text in the WYSIWYG column to insert text links...
  27. 27. ...or you can insert buttons either by highlighting your Call to Action...

    ...or you can insert buttons either by highlighting your Call to Action...
  28. 28. ...clicking on the Insert/Edit Link icon...

    ...clicking on the Insert/Edit Link icon...
  29. 29. ...entering your URL...

    ...entering your URL...
  30. 30. ...and choosing the Button class you want to use here,

    ...and choosing the Button class you want to use here,
  31. 31. ...or by clicking the Insert Component icon...

    ...or by clicking the Insert Component icon...
  32. 32. ...and clicking on or filtering by name for "1_Buttons - Global Button Styles" and following the prompts to set up your buttons that way.

    ...and clicking on or filtering by name for "1_Buttons - Global Button Styles" and following the prompts to set up your buttons that way.
  33. 33. When you're done, click SAVE at the top of the page...

    When you're done, click SAVE at the top of the page...
  34. 34. ...and then the Preview tab to check your work.

    ...and then the Preview tab to check your work.
  35. 35. Great job!

    Great job!